Tuesday, June 22, 2010

Grits, Asian-American Style

anson mills antebellum white grits 
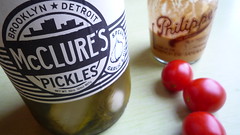
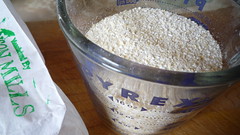
fig. a: Anson Mills coarse white grits

A stamped white paper bag, a Pyrex measuring cup, and some white grits.

Doesn't look like much, I know. But those aren't just any grits, they're Anson Mills antebellum coarse white grits, the grits David Chang has called "the killerest grits ever."

These grits being "the killerest," you could make them straight-up, add some salt and pepper, add a little butter, and you'd be sitting pretty, but you're not going to settle for straight-up, are you? Didn't think so.

No, you're going to follow David Chang and Team Momofuku on one of their flights of fancy. People often misunderstand the Momofuku experience as being just another example of "Asian fusion." Now, there's no question that there's some fusion going on within the Momofuku empire, but there's also quite a bit of fission. And, yes, Asian elements figure prominently. But there's a side to David Chang that's almost Kenny Shopsin-like. As far as I know, he hasn't invented any countries, then set about creating their national cuisines, but there's more imagination than one generally associates with the term fusion. The narratives are richer. They're more profane. They're also a hell of a lot funnier.

As Chang describes things, Momofuku Noodle Bar's Shrimp & Grits was a pivotal dish, because aside from the Asianesque broth that Chang used to make the grits, and that you couldn't actually see, "there was no Asian foundation, relation, or appearance to the dish. No other "noodle bar" was serving shrimp and grits."

The idea, the dream, behind the dish was to take a down-home Southern soul food classic, disarticulate it, ruminate on it, and then reanimate it in Momofuku's laboratories:

I imagined what it would be like if my ancestors had ended up in Charleston, South Carolina, a few generations before I was born. They would have eaten corn, they would have eaten grits, they would have cooked with bacon. Or, if Southerners were magically transplanted to Korea, they'd eat jook instead of grits at breakfast. And you know a people who can handle the salty power of a country ham certainly could have gotten down with kimchi. I imagined a Japanese cook making grits--you know he'd boil it in dashi and season it with soy.

I guess these were all conversations I was having with myself. I didn't want to be cooking shitty fusion food. I consoled myself by thinking about how Vietnamese cuisine and Cajun cooking adapted French techniques into something that might have looked French but tasted totally different. But it was with this dish that I decided--or accepted--that if we reached past "tradition" to create the truest and best version of a dish for our own palates, then what we were doing wasn't bullshit.
Chang recommends making this dish with either his Ramen Broth or his Bacon Dashi. We went with the latter a) because it's way simpler, b) because it's way cheaper to make, and c) because it's another great example of the Momofuku Philosophy at play. As Chang puts it:
I can't overstate the significance of bacon dashi to us at Momofuku. It's not the dashi itself--though it is delicious--but the thought process that went into it. The successful transposition of bacon from Tennessee for Japanese dried and smoked fish was an important early success for us, and it continues to be a driving inspiration of how we cook.

We respect tradition and we revere many traditional flavor profiles, but we do not subscribe to the idea that there's one set of blueprints that everyone should follow.
So the following are Chang's instructions (more or less verbatim), using Momofuku's Bacon Dashi.

Still can't see what all the fuss is about? Well, here goes:
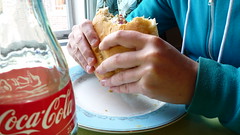
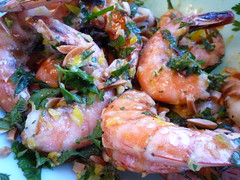
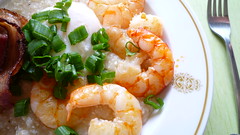
s& g:  before fig. b: before

Momofuku Shrimp & Grits

2 cups water
2 cups white or yellow quick-cooking grits, preferably from Anson Mills (SC)
2 cups Bacon Dashi (recipe follows)
2 tablespoons light soy sauce, such as usukuchi
kosher salt and freshly ground black pepper
8 tbsp unsalted butter, cut into pieces
1/2 pound smoky bacon, such as Benton's (TN) or North Country Smokehouse (NH), cut crosswise into 1- to 1 1/2-inch-long lardons
1 pound medium shrimp (16 to 20 count), shelled
2 tbsp grapeseed or other neutral oil, such as canola
4 freshly poached eggs
1/2 cup chopped scallions, greens and whites included

Combine the water and grits and soak the grits overnight (or for at least 8 hours) in the pot you'll cook them in.

Drain the grits, add the broth to the grits, and bring to a simmer over medium-high heat, whisking all the while. Continue to whisk for 5 minutes after the liquid simmers, then turn the heat down to low. You'll reach "first starch"--the point at which the fine corn particles thicken the liquid just enough to suspend the larger particles--after 5 minutes, and it's crucial to whisk constantly until you reach that point, and to turn the heat down immediately afterwards.

Add the soy sauce, a large pinch of salt, and some freshly ground black pepper. Keep the heat low and whisk regularly if not constantly; the grits should be thickening, undulating, and letting occasional gasps of steam bubble up and out. Soaked grits will be cooked after about 10 minutes over low heat. They're ready when they're no longer grainy, and they've become thick and unctuous.

Add the butter, stirring until it has melted and been absorbed into the grits. Taste them and add additional salt and pepper as needed. Set aside, covered to keep warm, while you get the rest of the dish in order (or serve them at once if you can't take it anymore and you just want to eat them solo).

Put the shrimp in a mixing bowl, pour the oil over them, and add a couple pinches of salt. Toss them in the oil and salt until they're coated. Set aside while you take care of the bacon.

Cook the bacon in a 12-inch cast-iron skillet over medium heat until the lardons have shrunk to about half their original size and are crispy, about 5 to 6 minutes. Remove the bacon with a slotted spoon and drain them on paper towels. Drain the bacon fat from the pan and reserve for another later use. Return the pan to the stove.

Make sure you've got your eggs poached and ready to go. They're ready? Good. Proceed.

Wipe the pan cleanish with a paper towel and turn the heat up to high. Cook the shrimp in two batches. As soon as the shrimp hit the pan, press down on them, using a bacon press, the back of a big spatula, a flattish pot lid, or a smaller pan--whatever works (we've found that a flattish pot lid works best for us). Sear the shrimp for about 1 minute on the first side. Watch the shrimp closely. As the gray-pink flesh of the raw shrimp gradually turns white in the side pressed against hot pan, and when that white line creeps about 40% of the way up the shrimp, flip them and press down on the second side. Sear that side only long enough to brown them a bit, about 30-45 seconds. Ideally, they should be just slightly shy of cooked when you pull them from the pan--they'll continue to cook after they come out of the pan. Use your judgment. Cook them a little longer if you prefer, but, remember, nobody likes overcooked shrimp. Nobody. Not even you.

Make up plates for 4. Shallow soup plates are ideal. Start with a big helping of grits, nestle a poached egg in the middle, and arrange 1/4 of the bacon, 1/4 of the shrimp, and 1/4 of the scallions in separate piles around the edge. Serve at once. Savor.

Serves 4.

Momofuku Bacon Dashi

2 x 3-by-6-inch pieces of kombu
8 cups water
1/2 pound smoky bacon, such as Benton's (TN) or North Country Smokehouse (NH)

Rinse the kombu under running water, then combine it with the water in a medium saucepan. Bring the water to a simmer over medium heat, then turn off the stove. Let steep for 10 minutes

Remove the kombu from the pot and add the bacon. Bring to a boil, then turn the heat down so that the water simmers gently, and simmer for 30 minutes.

Strain the bacon from the dashi, and chill the broth until the fat separates and hardens into a solid cap on top of it. Remove and discard the fat and use the dashi or store it. Bacon dashi will keep, covered, for a few days in the refrigerator. You can also freeze it for later use.*

Makes 2 quarts. You'll only need 2 cups of this for the shrimp & grits, so you'll have plenty left over for other uses.

[both recipes from Momofuku by David Chang and Peter Meehan]
The resultant dish is one that's remarkably subtle, but utterly irrepressible. When I finished making the dish the first time, I remember saying to Michelle that I was surprised that the recipe didn't call for some kind of Asian-inflected sauce that you'd drizzle overtop, but then I went and took my first bite and suddenly I understood.

The taste sensation comes from below. It's deep in the grits, it's released by the butter that finishes the grits, and it's transformed into something that's positively rapturous when you take your fork and release the egg yolk and stir it up with the grits, the shrimp, the egg, the bacon, and the scallions.
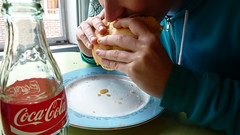
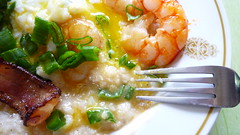
s & g:  after fig. c: after

Are you starting to get it?

aj

P.S. A note on sources: as I've mentioned before, quality shrimp can be hard to find in Montreal, and this dish requires some reasonably fresh, juicy, tasty shrimp, so don't bother making it if you're not satisfied with the product at your local fishmonger, or, better yet, shop around. Sometimes quality can vary greatly from one poissonerie to the next. The best shrimp we've found in recent months have been at Poissonerie Shamrock (7015 Casgrain Ave., 272-5612) and at Norref (4900 Molson St., 593-9999).

You can use other brands of grits, of course, but Anson Mills' grits are pretty killer. Be sure to use quick-cooking grits, though, or you'll find yourself stirring furiously for an awfully long time.

* Among other things, Chang claims it's great with clams. I haven't had the chance to test this out yet, but I believe him.

Monday, June 21, 2010

Top Ten #35

1. AEB Superdawgs

fig. a: Mr. Smith & co., 1939

2. Mr. Smith Goes to Washington, dir. Capra

3. Eating your way across NYC

4. Grilled Lobster with Pickled Peppers, Preserved Meyer Lemon, and Toasted Almonds

fig. b: Joan, 1967

5. Joan Didion, Slouching Towards Bethlehem

6. shrimp & grits

7. Radwan Moumneh/Ariel Engle + Hrsta + friends, La Sala Rossa, June 6, 2010

8. Al's French Frys, Burlington, VT

fig. c: FC, 1968

fig. d: FC, 1969

9. Fairport Convention, S/T & Unhalfbricking

10. Kazuality by Kazu

Sunday, June 13, 2010

Sweet Tweets

kesar mango 1

All those interested in following Michelle's dolce vita, look no further: she's now on Twitter.

How else are you going to keep abreast of limited-time-only desserts like the mango medley* you see pictured above? Live and in-person, perhaps:

Laloux, 250 Avenue des Pins East (Plateau Mont-Royal), 287-9127

aj

* featuring Kesar mango sorbet, coconut milk panna cotta, Assam tea crumble, candied cashews, candied fresh coconut, lime, and cilantro leaves.

Thursday, June 10, 2010

Dressed to Kill

Gonna dress you up in my love
All over, all over
Gonna dress you up in my love
All over your body
--Madonna, "Dress You Up"

The word on the street for hot dogs this year is DRESSED UP. Of course, dressed up is the way many discriminating dog lovers have been doin' it for decades, especially in such advanced hot dog civilizations as, say, Chicago. But sometimes those of us who live in somewhat less sophisticated hot dog cultures need a little encouragement to go to town, so to speak. I mean I love an all-dressed toasté as much as the next guy (possibly even a whole lot more than the next guy), but does mustard, onions, salade au chou, and day-glo relish really qualify as ALL-DRESSED?

the fix is in fig. a: the fix is in

A recent whirlwind excursion to the Big Onion resulted in a number of astounding drinking and dining experiences (news to follow), but when the dust settled, we also found ourselves in the possession of a beautiful, if dear, jar of McClure's premium garlic & dill spears. And suddenly we started dressing our dogs in more elaborate attire.

AEB Superdawgs*

4 premium wieners of your choosing**
1-2 tablespoons vegetable oil
premium pickle spears, such as McClure's
premium pickled green tomatoes, such as Graves
and/or premium chow-chow, such as ours
and/or premium relish, such as McClure's
premium extra-spicy mustard, such as Philippe's
quality mayonnaise, such as Hellmann's
2 green chile peppers, preferably Anaheim, diced
minced onion, preferably red or vidalia
8-12 ripe, delicious cherry tomatoes, quartered
olive oil
red wine vinegar (optional)
salt
freshly ground black pepper

2-4 hot dog buns, toasted

Prepare your garnishes and assemble your dressings and accompaniments. In the case of the cherry tomatoes, toss them with just a bit of olive oil and a touch of red wine vinegar (if you so desire), and salt and pepper them to taste. In the case of the pickle spears, slice any and all pickle halves into thirds lengthwise to make long, slender spears.

Heat about 1 tablespoon of the vegetable oil in a pan over medium heat. When the oil is hot, place your wieners in the pan and slowly roast them until they are crispy and even just a little bit blistered all over. If done properly and patiently, this should take several minutes.

When the dogs are cooked to perfection, add the green chiles to the pan and stir-fry them quickly. If you need a bit more oil to do so, add the second tablespoon of oil. Add salt and pepper to taste. Remove from heat.

Finally, toast your buns in your hot, lightly oiled pan.

Slather your toasted buns with pickled green tomatoes (and/or chow-chow and relish) on one side, hot mustard and mayonnaise on the other. Place the hot dogs and a couple of pickle spears in the buns. Add the onions and sauteed chile peppers. Top with tomatoes.

Muster up the courage to somehow hold that overstuffed bad boy together and devour.

Satisfies 2-4 mightily.


Now, we have a bit of a hot dog bun problem in Montreal. We can get decent steamé/toasté buns like POM, but one of the reasons that our dogs aren't particularly overstuffed and those of, say, Chicago often are, has to do with the vehicle. Let's face it, our standard hot dog buns just don't have the girth and the character to handle a seriously dressed-up dog, even when they've been properly toasted. Which is why we've been experimenting with alternative vehicles here at the AEB Labs.

So, for instance, your basic Portuguese bun has a lot more to do with a traditional sausage bun than it does a traditional hot dog, but at least it's capable of carrying a heavy load like an AEB Superdawg. Not ideal, but fresh and functional. [Note: if you follow our lead and use a Portuguese bun, be sure to rip out some of the bread from the inside, otherwise it will be too bready and will overwhelm your dog. That extra bread is fine for a sausage sandwich, but a hot dog? Not so much.]

superdawg attack 1

superdawg attack 2 figs. b & c: superdawg attack!

The folks at Cheskie used to make a long, peppery onion bun that had plenty of character, but they seem to have changed their recipe recently and added whole wheat flour to the mix. So sad.

So the search goes on... Which means, if you live in Montreal and you have any ideas, please, do tell.

Meanwhile, we've been enjoying our Superdawgs with a rotating cast of vehicles.

Calling the AEB Superdawg a taste sensation would be an understatement. Yes, you guessed it--that dawg is dressed to kill.

aj

* With apologies to Superdawg of Chicago.

** Substitute with a premium veggie dog of your choosing, if you must.

Sunday, June 06, 2010

pickled & preserved

A16 fig. a: this guy means business

Nate Appleman has since moved on to the bright lights of the big city and a starring role at Pulino's, the Bowery bar & pizzeria that is restaurateur Keith McNally's latest joint, but the A16 cookbook (A16: Food + Wine), which documents Appleman's days in San Francisco and his partnership with Shelley Lindgren, remains one of our faves of the last couple of years.

A16 fig. b: A16, the book

And one of the things that we admire the most about the A16 cookbook, and about Appleman's technique, is his insistence on the pickling and preserving of the freshest ingredients at the height of season in order to develop a veritable arsenal of flavors at one's disposal. Appleman's hardly the only one to cultivate this approach--this is obviously a highly traditional approach to cuisine--but not everyone is as committed to this culinary philosophy as Appleman is, not everyone has his flair when it comes to combining flavors, and not everyone's got his tattoos. There's a reason Appleman was the recipient of a James Beard Foundation Rising Star award last year.

Anyway, leafing through A16: Food + Wine can be a little bit frustrating at times, precisely because of this insistence on preserving. The book is full of tantalizing recipes that require you to have built up your pantry first. But build up your pantry even just a little, and all of a sudden the world according to Nate begins to open up for you, and the beauty and simplicity of so many of his recipes will have you diving right in.

Take Appleman's recipe for Preserved Meyer Lemons. The recipe looks like this:

Preserved Meyer Lemons

8 Meyer lemons
a generous amount of kosher salt
freshly squeezed Meyer lemon juice, as needed

Wash the lemons well and dry them with a towel. Working from the blossom end of the lemon, quarter each of them with a paring knife, stopping just before you cut through the stem end. Each lemon will look like 4 separate wedges held together by the intact stem end.

Working from the blossom end, pack the inside of each lemon with about two heaping tablespoons of salt. Place the lemons in a large canning jar in which they fit snugly, and cover with a generous layer of salt. Cover the jar tightly and leave it out at room temperature for a couple of days, or until the lemons submerge themselves in their own juice. If the lemons do not release enough juice, add freshly squeezed lemon juice to cover. Refrigerate the jar for at least three weeks before using, checking in on the lemons every now and then to make sure they're still submerged in their juice. The lemons will keep indefinitely if they are completely covered with juice.

To use a preserved lemon, slice off the still-attached stem end to separate the wedges. Using a sharp paring knife, remove the flesh and the pith from the rind and discard them. Soak the rind in cold water for 30 minutes to leach out the excess salt, and then mince the amount of rind called for by the recipe. Any leftover cleaned rind can be kept, submerged in water, for up to one week in the refrigerator.


Clearly, you're going to have to plan ahead on this one (unless you happen to have a source for preserved lemons in your hometown), but once you've made them, not only do you have a seriously phenomenal ingredient on-hand, one that you could use for all kinds of North African, Spanish, and Italian preparations, but you also have a key ingredient allowing you to make such A16 knockouts as Braised Halibut with Pistachios, Preserved Meyer Lemon, and Capers.

A jar of Preserved Meyer Lemons is like a beam of sunshine radiating out of your refrigerator every time you open it, but don't get hung up on getting Meyer lemons if you live somewhere where they're unavailable or overly cost-prohibitive, or if you missed the season--just find yourself the best, most fragrant, wax-free, and possibly organic lemons you can afford. You won't regret it. And, again, if you happen to live somewhere where you can buy preserved lemons at your local Moroccan, North African, or Middle Eastern specialty foods store, feel free to cut corners.

But let's say you've got the time and the patience. When you've aged a jar of those beautiful preserved lemons to perfection, you can go ahead and make this dish:

grilled shrimp with preserved lemon, etc. fig. c: shrimp by A16

Grilled Shrimp with Pickled Peppers, Preserved Meyer Lemon, and Toasted Almonds.

Looks and sounds tasty, right?

Now, the thing is, in order to do so, you'll need one more batch of preserves--Appleman's Pickled Peppers--but fret not, these only take an hour or two to make. And while the original A16 recipe calls for Gypsy Peppers, a sweet pepper that's in the same general category as Italian fryers, certain Hungarian peppers, and sweet banana peppers, use whatever flavorful mild to medium-hot pepper you have available where you live. You can even go with a little heat, if you like--the peppers become a little milder after they've been pickled, and the recipe calls for the addition of some jalapeños anyway.

pickled peppers fig. d: peppers, pickled

Pickled Peppers

1 pound Gypsy peppers
2 red jalapeño peppers
2 cloves garlic, smashed with the side of a knife and peeled
2 teaspoons kosher salt
2 cups distilled white vinegar
1 1/2 cups water

Halve the peppers and chiles and remove the stems, seeds, and membranes. Cut the peppers lengthwishe into 1/2- to 1-inch-wide strips. Coarsely chop the jalapeños. In a heatproof bowl, combine the peppers, the jalapeños, the garlic, and the salt.

In a pot, combine the vinegar and water and bring them to a boil. Remove from the heat and pour over the pepper mixture.

pickling pepper fig. e: peppers, pickling

Let stand for about 1 hour, or until cool. Using a slotted spoon, transfer the peppers to a jar or other container in which they fit snugly. Pour in the pickling liquid, making sure the peppers are fully submerged. Cover tightly and store in the refrigerator for up to 3 weeks.


Okay. You've got your preserved lemons, you've got your pickled peppers. Now you're ready to make the shrimp.

Grilled Shrimp with Pickled Peppers, Preserved Meyer Lemon, and Toasted Almonds

1 1/2 pounds fresh or thawed shrimp in the shell, like Matane shrimp, preferably with theirs heads on (roughly 24-30 shrimp)
kosher salt
1 1/2 cups pickled peppers (see recipe above), coarsely chopped
1 tablespoon soaked and chopped preserved Meyer lemon (see recipe and directions above)
1/2 cup extra virgin olive oil
2 tbp freshly squeezed lemon juice
2/3 cup whole almonds, toasted*
1 tbsp chopped flat-leaf parsley
1 tbsp chopped fresh mint

Toss the shrimp in a bowl with a couple generous pinches of salt. Cover and refrigerate for at least 1 hour and up to 4 hours.

In a food processor, combine the pickled peppers and chiles and the preserved lemon and process until almost smooth. Transfer the mixture to a bowl and stir in the olive oil and lemon juice. Taste for seasoning and add salt or a splash of the pickling liquid if needed. Set aside.

Prepare a hot fire in a grill, spreading the coals evenly for direct-heat cooking.

To prepare the shrimp, peel away the middle section of the shell, leaving the head and tail segments intact, and trim off any long antennae. Make a shallow slit along the back, and lift out and discard the dark, vein-like intestinal tract, if you so desire.

When the fire is ready, arrange the shrimp on the rack and grill, turning them over once, for no more than 4 minutes total, or until opaque. Be careful not to overcook the shrimp, or they will become tough.

Arrange the shrimp on a platter and drizzle generously with the pepper sauce. Sprinkle the almonds over top, garnish with the parsley and mint, and serve immediately.

Eat with your hands and enjoy. These shrimp make for a delicious mess.

[adapted slightly from A16: Food + Wine]


Now, Appelman's grilled shrimp are outstanding--that combination of the preserved lemon & pickled pepper sauce, the toasted almonds, the mint, and the smokiness of the shrimp is truly out of this world--and they're fantastic as an appetizer or a side dish, but the recipe can also be easily adapted into something a little more substantial.

For instance, it makes a great pasta dish if you peel the shrimp before tossing them with the sauce, the almonds, the herbs, a pound of freshly cooked, al dente capellini, and just a little of the pasta water from your pot.

You can also use this sauce with other types of seafood because, let's face it, Montreal's not the greatest shrimp city. With the exception of the painfully short Matane shrimp season, our shrimp are far from local or even regional, and the devastating impact of the BP oil disaster is likely to make things exponentially worse. Montreal is a great lobster city, however, and we're right in the thick of Quebec's late-spring/early-summer lobster season, so why not make the recipe with steamed or (even better) grilled lobster instead? Start with a live lobster, and you can't get any fresher. Serve the finished product over Bibb lettuce, and you'll have yourself an exceptionally great seafood salad.

shadowplay fig. f: shadowplay

That's exactly what we did.

Not sure if Mr. Appleman would approve, but it sure tasted sensational to us.

aj

* To toast nuts, preheat your oven to 300º F. Spread the nuts in a single layer on a rimmed baking sheet and toast, tossing, and rotating the pan often, for 10-20 minutes, depending on the nut and whether or not the skins are on them. Skinned nuts take less time. Skinned and slivered or chopped nuts take even less (maybe as little as 5-7 minutes). Toast until the nuts are aromatic and golden. With skin-on nuts such as almonds, test for doneness by breaking a nut in half. It should have a consistently light caramel color at the center. Be very careful not to burn them, or you'll have to start over, because the flavors will be thrown off.